Puns N Needles

Dispatches from my adventures: sewing, knitting, and otherwise.


Leave a comment

New shop, new blog

Thanks for your interest in punsnneedles and thanks to those who have followed me. I’ve opened a shop and moved my blog to the shop’s website. If you’re interested, I encourage you to follow me over there. Latest post is at https://makeitsewva.com/2018/06/11/more-about-double-gauze/ and you can also find me on Instagram at @makeitsewva and Facebook too.


Leave a comment

The birds and the … horses

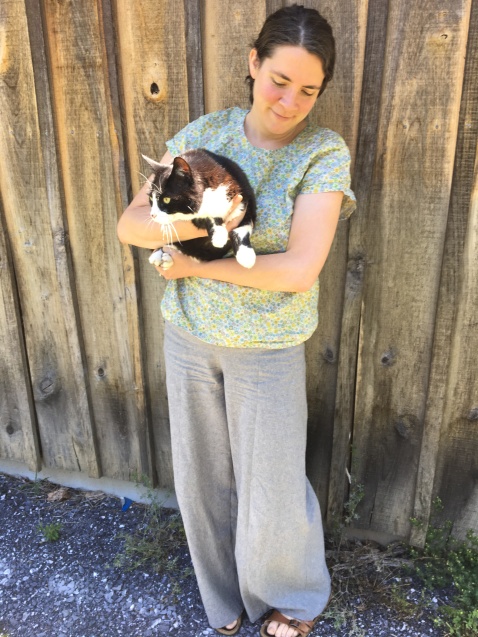
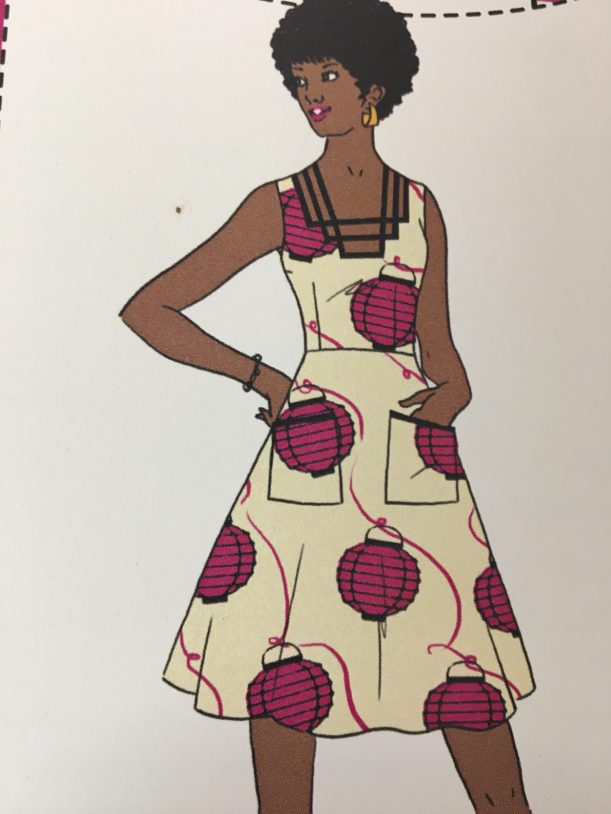
I finally have a Jennifer Lauren Afternoon blouse. And an afternoon dress.

It’s a simple design with graceful lines that fit in to my vintage and modern sense of style. I’ve had my eye on the pattern for a while and having made it, I can now tell you it’s a good one. I’m usually a hater of non-functional buttons but in this case, it suits the dress well.

Based on my measurements, I chose to make a size 14 with a full bust adjustment. It took a little trial and error to get the bust dart in the right place, making me glad that I did a trial run.

Laying out the blouse pattern pieces

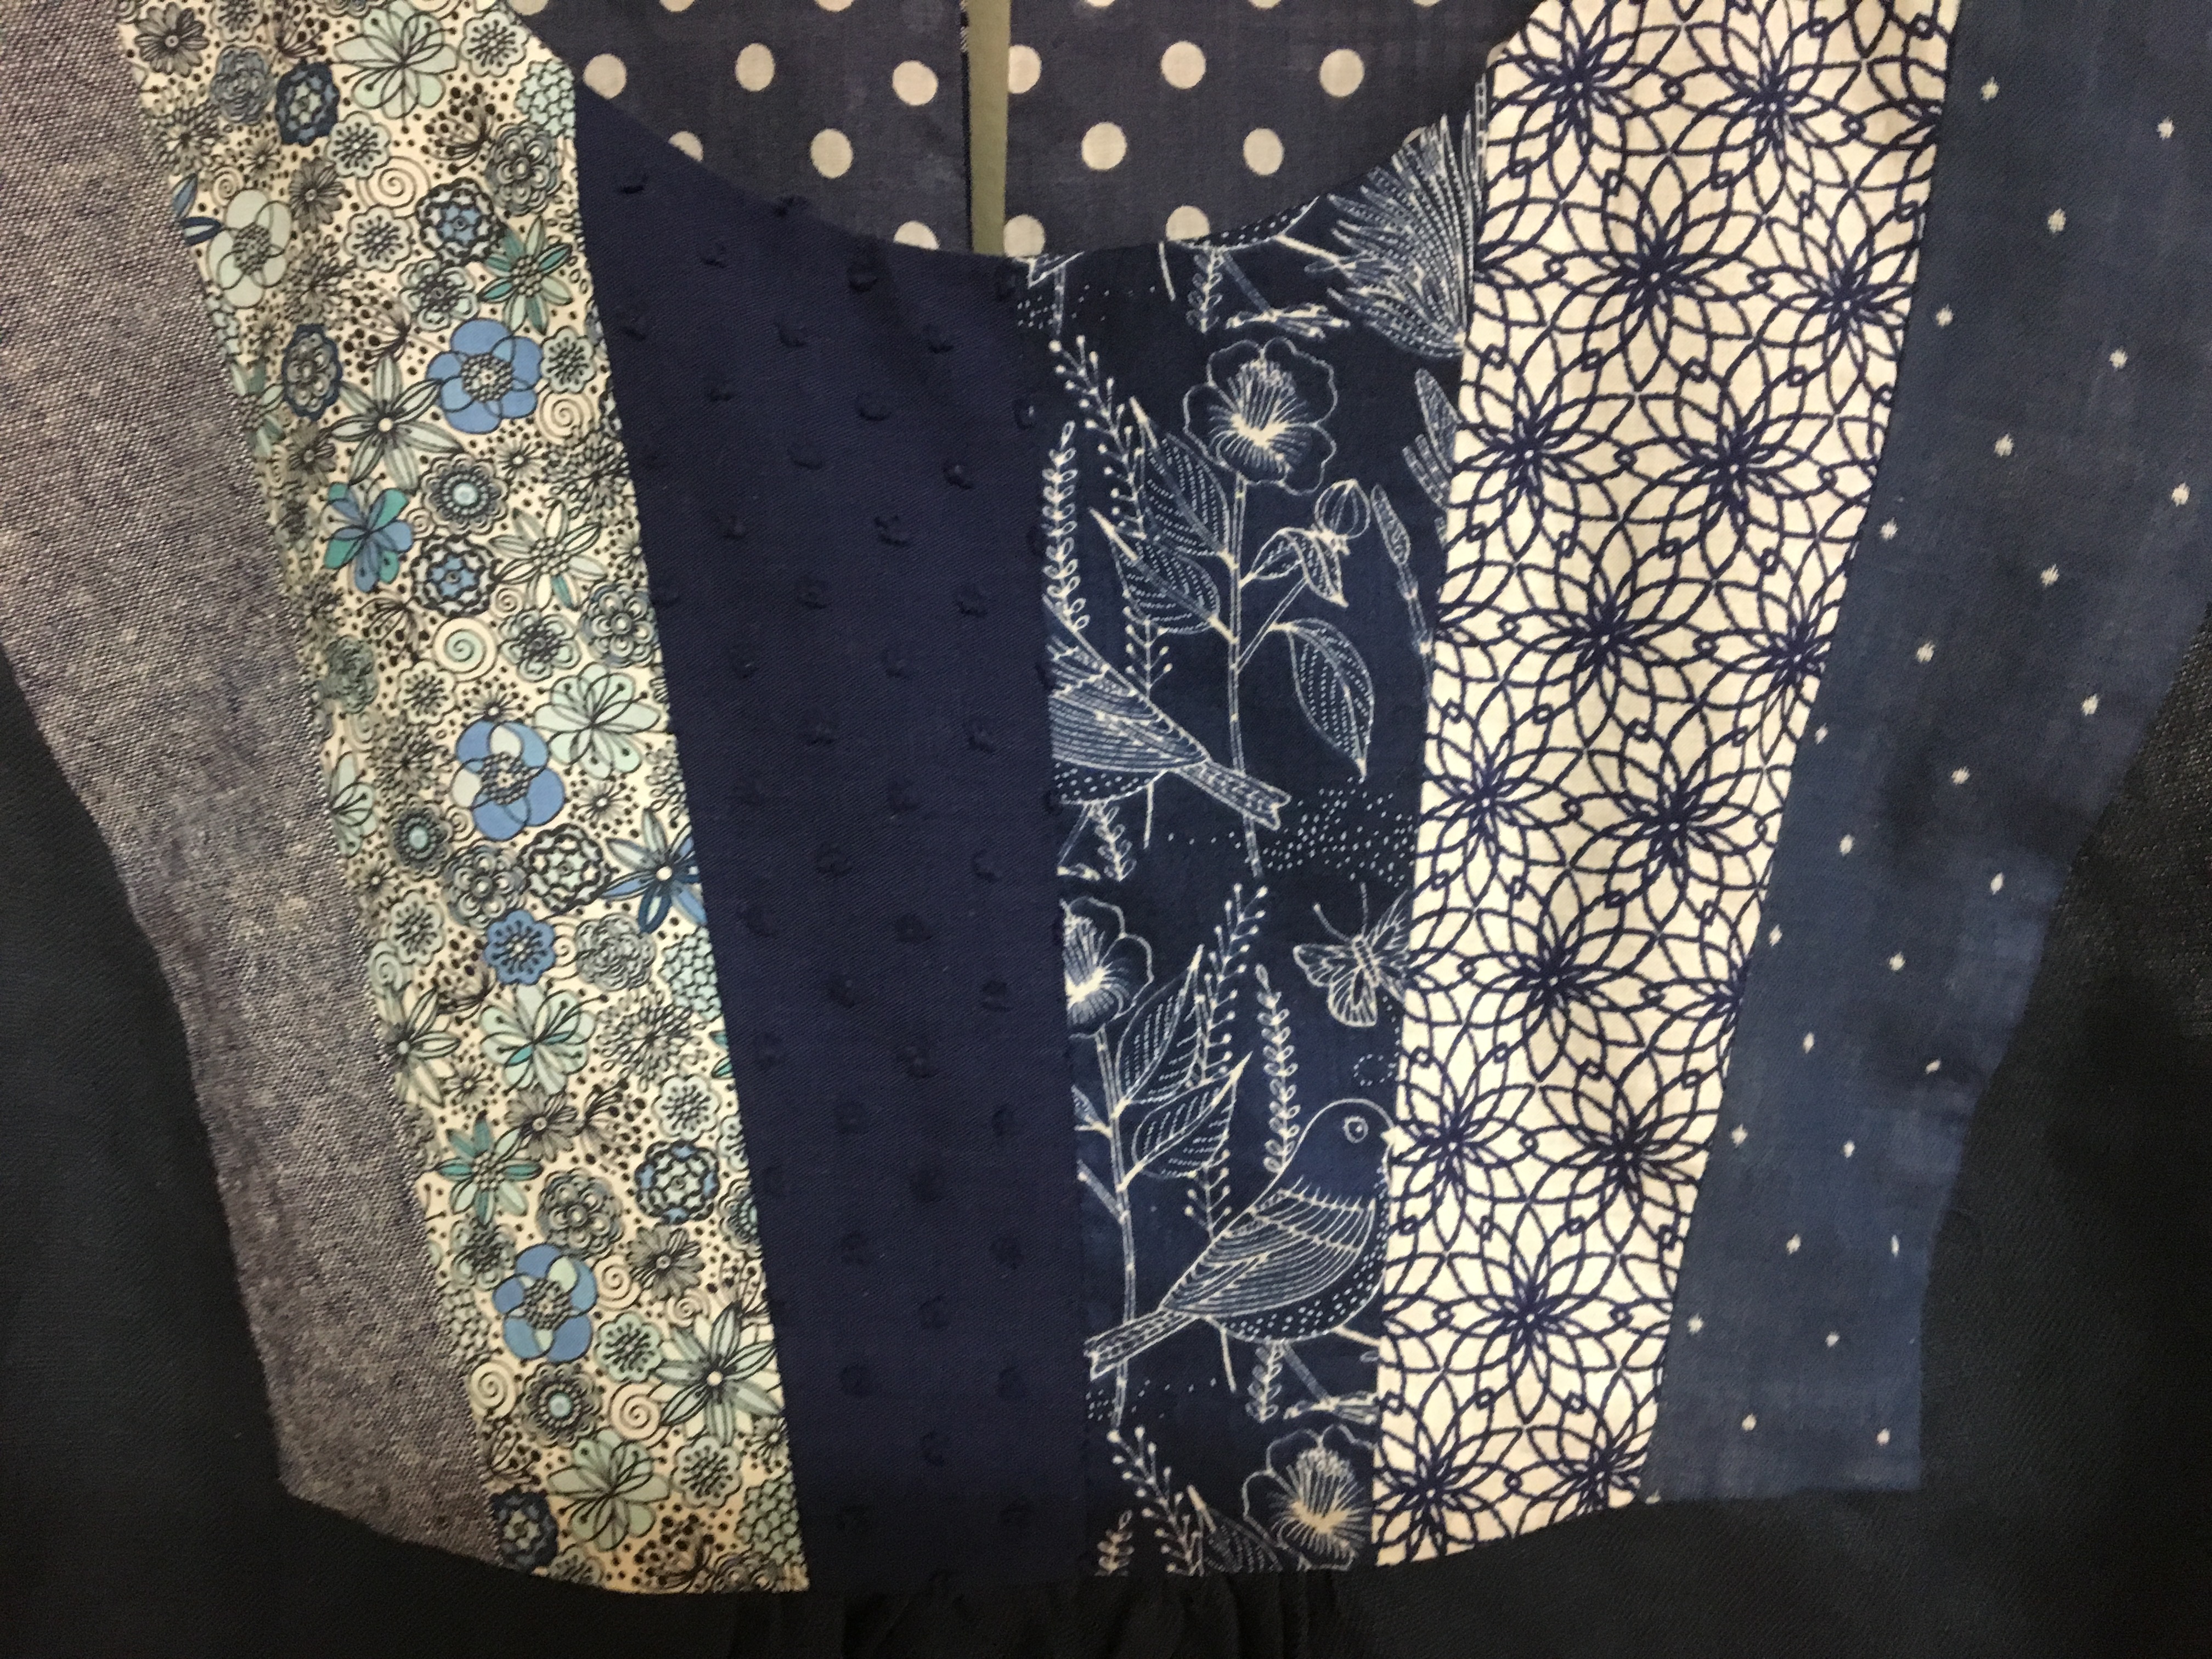
My “muslin” or tester garment is the blouse version. Knowing I would make the dress in a lovely drapey rayon, I picked through my stash and found just enough of this horse print. When I bought the horse fabric several years ago, I thought it was “Italian Cotton,” but since then I have come to believe it’s rayon. It’s a bit flimsier than the Cotton + Steel bird fabric, but was close enough to check the fit.

Pockets!

Once I was happy with the fit — and really, that was no more work than the FBA— I extended the length. Extending the line from the new post-FBA side seam made the bottom portion approximately a size 16, so I used that size’s length as well. I assembled the dress without the box pleat, thinking I would try wearing it first and decide whether I wanted one and how big it should be. I’m happy with the way it fits without one. I struggled a little, too, with understanding the box pleat instructions, and while the illustrations of the pleat are a little vague, I did find more detailed photos on the website.

Inside bottom of front yoke

The only construction challenge I had was in attaching the front to the front facing. The instructions are good, and illustrations clear, it’s just a tricky thing to put together. On my dress, the second version, I clearly marked the stitching lines and pivot points, and it went together more smoothly. I would suggest that if someone was unsure about doing that part, they try a practice run first. I also appreciate Jen’s optional instructions to topstitch the neck—with my combination of narrow shoulders and large bust, it helps to not expose what ought not be exposed.

The cat wanted in on the photo session.

I enjoyed making this dress, and the tester blouse. It went together relatively quickly and could become a prominent part in my wardrobe. I’m glad I finally sewed it, and while the pattern was provided to me in order to test and review it, the opinions are entirely my own. Jennifer is highlighting one of her patterns each month, and if you are interested in seeing more of her designs and the completed projects other sewists have made, check out her website.


Leave a comment

A Decades of Style Dress

It started in an antique store near Bucks County, Penn. We stopped in there on the way to somewhere else and I came away with three pieces of vintage fabric. I used one piece to make plaid pajamas, and one piece still remains uncut. There were more fabrics in the antique store yet I restrained myself. But that’s neither here nor there. I’m here to tell you about a dress. It’s a very specific dress, and it’s the dress that I wore recently to my friend Sarah Rose’s wedding.

We call ourselves “the grandmas.” Its a long story. The bride is in the floral dress.

I am not one of those people who only buys fabric or patterns when she has a specific project in mind. I think it would be better for my wallet if I were. I have a large stash and probably don’t have to buy any fabric for a year or two (but please don’t tell my husband I said that). When I’m planning to sew a garment, sometimes I start out with the fabric, and sometimes I start out with the pattern, but most of the time I am rolling one of those around in my head looking for inspiration. This time, I knew I wanted to make the Cat’s Cradle Dress from Decades of Sewing.

Pattern cover art

I’ve made a couple Decades of Sewing patterns before and really like the aesthetic. I was also pretty sure that it would be relatively easy to fit this dress and because of the dramatic neckline, it would certainly turn out really cool. And then I scratched my head for a few days trying to decide on a fabric to use. Of course, I was prepared to buy more fabric if I needed.

Working on the pattern

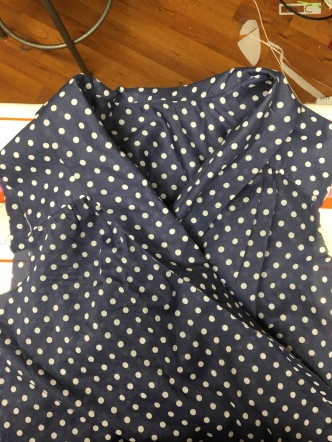
But the perfect fabric for the dress was right there in my stash, from the antique store on the way to Bucks County. One of the most intriguing things about this fabric is the tag, which unfortunately went missing in the two years between buying it and sewing it. The way this fabric was labeled was a big part of what made me buy it. Of course the pink, turquoise, and gold print on it was pretty special, but the seller called it “Ugly Dress Fabric.” I didn’t really think it was ugly — kind of unusual, sure, but not universally ugly. And though I never told the bride about what this fabric was called, I always thought she’d get a kick out of its name.

“Ugly dress fabric”

And for anyone who’s still reading and is curious about my process: I made two muslins and discovered that the plaid fabric I used in the first had a little more stretch and give than my “fashion fabric.” Hence the second one. I also debated for quite a long time over how to orient the stripes in the bodice and the skirt of the dress. I was able to try it on the dress form.

And the step that was both fun and took me to a style place that I wasn’t expecting: trying out the trims. I bought 3 different trims and thought I would like the gold one best—As you can see I went with the turquoise.

Thanks for reading. Do you ever change directions while making something? Do you have any good stories about buying “secondhand” fabric?


Leave a comment

Christmas in July

No, I’m not in the southern hemisphere where it’s currently winter. But I woke up one morning a few weeks ago with excitement and anticipation rivaling that for a kid on Christmas morning. I got out of bed knowing that I had just about 90 minutes left before I was completely finished working on a project that had my attention for several weeks.

It started with a text from a friend that went something like “My dad is looking for someone to sew 10 leather cushions for his office. Are you interested?” The answer was easily yes, though I didn’t know exactly what it would entail. That led to an email from her dad, which led to him dropping by my new workplace with a piece of leather and a sample cushion that he’d made in cheap denim and foam. And finally, this morning, it was done.

Setting snaps, a final step.

The project was pretty straightforward: sew up 10 matching cushions in black upholstery leather (provided by friend’s dad); procure foam and make the cushion inserts. Even with the piping/welt and zippers, it was not a technically challenging sewing project. However, I was terrified.


The client provided the leather,  which he purchased at a local Mennonite harness shop. We met in the parking lot of my workplace to move it from his vehicle to mine, and once I got it to my sewing room, it sat for a few days. I was kind of afraid to touch it.

The hides were so large that I did most layout and cutting on my sewing room floor.

Leather isn’t cheap. I assume he was charged a fair price for the material which is quite durable, but definitely more expensive than say, canvas. And, unlike canvas, it’s not very forgiving because each time a needle punches through leather, it leaves a permanent hole. There aren’t really do-overs when sewing leather.

Preparing the seat cushions, foam and dacron.

Finally, I was just plain scared that I’d screw something up. I was being hired to provide 10 leather cushions for a classy conference room, using material that was given to me, and I dare not mess up.

And guess what? I did mess up. About midway through the project, with (mostly self-imposed) deadlines approaching, I realized that I had put together some pieces backwards. It was really frustrating. I didn’t know if I had ruined material (spoiler alert: I didn’t). I wasn’t sure if I should have been doing this project at all. It was upsetting, because like I wrote a few paragraphs back, it was not a technically challenging project for me. So smart man that my husband is, he suggested I stop working and come back to the cushions the next day.

Some of the thread removed when I had to take some pieces apart.

I’m glad I took his advice because the next day, when I was re-doing multiple hours’ of work that I had lost to my foggy brain, I realized something. I could do this. Yes, I always knew that I knew how to create these cushions but I had a lot of uncertainty about how I was going to do the job. And while I struggled to overcome my mistakes, I gained quite a bit of confidence.  There are several hours of my life that I’ll never get back, but I do know that I can tackle another project like this again.

Delivering the cushions. I’ll miss their smell.


Leave a comment

A really fun top

I shared some pictures of this top with a facebook group and there were some questions about the pattern, so I thought I’d write a little more about it.

It’s the Painted Portrait Blouse/Dress pattern from Anna Maria Horner. I think that no matter a person’s personal style, it’s hard to deny that this pattern has the potential to be really fun. Just do a Google Image search and see all the different variations: sleeveless, sleeved, or the dress version; solid yoke in the same fabric as the main top; solid yoke in a contrast fabric; or my favorite, the pieced yoke.

It’s comfy, easy to wear, and cool.

I made this once last summer entirely from scraps. In fact, I cut up a favorite linen dress for the main pieces of the top because the dress no longer fit and the armhole edges were fraying something fierce. I used bits leftover from soft voile scarves that I made one Christmas, and some leftover eyelet sort of fabric, all in shades of coral.

Not long ago, I noticed that a lot of the garments I’ve been making are shades of navy blue. I also happened to have some scraps of navy blue linen from a pair of pants I made long ago, so it seemed the right opportunity to make the top again. I had fun carefully choosing the fabrics for the yoke pieces and the yoke facings. I’m really happy with how it turned out.

Then I set to putting the top together. I remembered having some trouble with the instructions the first time—nothing too taxing, but enough to slow me down and pause while I read and re-read the instructions. On my second go-round, I was ready: I had one 99% successful Painted Portrait top under my belt with my recollections of the trouble I had making it. I was also prepared to just take a deep breath and know it would turn out fine.

Here are the challenges that I found in the instructions:

  • It’s a lot of text with few images, and it’s crowded onto one (large) sheet of paper. This is not ideal for visual learners or very new garment sewers.
  • Some of the terminology is different from most other garment sewing that I’ve done. For example, one step instructs to “edgestitch the neckline through facings and seam allowances…” I believe that this is usually called understitching in other patterns.
  • There seems to be a typo or mistake in the instructions. The armholes are finished with bias tape and the instructions say to cut 1” wide bias strips. Then we’re instructed to sew the strip to the armhole edge with a ⅝” seam allowance, then press the strip toward the armhole, fold to the inside and topstitch. This leaves a raw edge, if you can even get the bias strip to fold inside. You need about a 1 ½” wide bias strip which you can stitch to the armhole at ⅝”. Then you trim the seam allowance to about ¼”. Press the bias strip up, toward the seam allowance. Then fold and press the strip (around the seam allowance) so the edge of the strip is just inside the stitching line. Finally, press that all to the inside, so you don’t see the bias trim from the outside. Pin and topstitch (or handstitch) around the armhole. You can find tutorials and videos describing this if you search Google for “bias finish armhole” (or something like that).


Leave a comment

MeMadeMay + a little bit of June

In my last free time to sew on the last day of May, I thought I was going to make another Ann Carolyn Smock. It’s one of my favorite patterns, with raglan sleeves and a yoke front, with different length options. But instead, I decided to try this new-to-me vintage pattern than I found at the Habitat Re-Store while on a little trip several months ago. The price was right—what can I say?

Vintage pattern. Early 1980s?

I didn’t bother with a muslin this time. It’s a pretty forgiving style, and the pattern front and back widths are comparable to Ann Carolyn’s. The size Large was cut already (my size in this top — hoorah!) except for the sleeve for the view I chose, so I traced that off the original.

Results of first cutting session

I went back to my stash and selected this yellow linen. I bought it on a whim with no real plans for it—I love linen and it was a good price—and I could use a solid colored top in my work wardrobe. I was able to cut all the small pieces, fuse the interfacing to the front and back neck facings, and prepare the sleeve cuffs before my sewing time in May ran out.


Though I was racing against the clock to make a second garment before the end of May, I was still working to embrace “slow sewing.” I want to be more deliberate about what I make—to carefully choose the patterns that I make (so they reflect the kinds of clothes that I want and need, and are comfortable), and to make them carefully (so they will continue to look good and feel good for years into the future). I also want to continue to become a better sewist.

  • I worked on my marking methods. I usually use wax paper and a tracing wheel but sometimes it doesn’t work great. This time I practiced tailor’s tacks. They are quick and really useful.
  • I carefully followed the instructions for reinforcing seams and, something I used to hate, understitching. This helps keep a facing from showing to the outside and I am a huge believer in understitching now.
  • I noticed some different assembly and finishing methods in this vintage pattern. This one recommends the “stitch and pink” finishing method (I used my serger), and, it instructs the maker to press parts of some seams to the back and another part of the seam open. It also had me hand-hem the split in the sleeves, which was pretty fiddly but I don’t know how else it would have been done.
  • I forgot to trace a mark onto my copy of the sleeve pattern. I was ready to attach the neck band, and I very carefully matched up markings and seams, but something didn’t work. I tried matching the band to the body twice before going back to look for missing marks. Once I found the missing dots, it fit together perfectly.
  • Fitting the neck band into the shirt front was really challenging and ended in me handstitching it into place. The pattern also includes a “Time-Saving Shortcut ™” which is to stitch in the ditch  to attach the neckband facing — I handstitched that because I knew it would be easier for me, it would be satisfying, and I have a new porch swing that was calling.

Porch swing sewing

Other than the finishing treatments that I don’t see as often in the contemporary patterns that I use, this top went together very smoothly. Since it’s got raglan sleeves, there are really only six seams. When I first tried it on before it was finished, I thought about adjusting the fit and making it a little smaller. It felt like I had put on a XXL men’s t-shirt. I thought about what belt I could wear with it, and figured that if I didn’t like it once it’s done, I could take in the side seams.

Relaxed style

But once I installed the buttonholes and buttons, I decided that it’s not a style that I typically wear (because it’s the year 2017 and the pattern’s from the 1970s or ’80s?) but I like it.


Leave a comment

Sailing toward my dream pants

I’ve wanted “sailor” pants for a long time, and I really like the shorts I made with this pattern last year.
img_1088.jpg
So several months ago, I cut out the pants version of the pattern in some mystery canvas as a trial run. The pieces sat for months while other projects took priority, and the size I cut is now too big. As in, I almost can’t wear the shorts from last summer. That’s why my promise to make two new pieces of work clothes in May had a rocky start.

I don’t like wasting materials, so I wanted to use what I’d already cut for a muslin. I had to re-print and assemble the PDF pattern because last time, I cut up the original (which was a giant piece of 48 letter size pieces of paper taped together). Hindsight being 20/20, for this version, I traced the pieces. Then, I laid the newly-cut pattern pieces over what I’d already cut, and thankfully, most of the pieces could be re-used.

Happily, I only had to re-cut one pattern piece and then it went together pretty quickly. I had to make a small adjustment, letting out the inside front piece

Seam let out/small wedge added to right of slash pocket opening


but otherwise was really happy with how the pants fit.

Linen swatches
From my stash, I decided on this Robert Kaufman Essex Washer Linen yarn dyed (a linen/cotton blend) in a charcoal color for the “real” pants. I love this fabric, and really like the two tops I made from it, so I’m pretty sure it’ll make good pants. Grey is my favorite neutral, so I expect I’ll wear them a lot. The other two are blended with rayon and will make nice dresses, tops, or jackets.

The pattern says that 1.7 yards are required for my size range, though I barely squeezed it out with 2 ¼ yards. I couldn’t find a recommended pattern layout but can’t see where I could have re-arranged the pieces and had any more leftover. I used a novelty print quilt cotton for the pockets and waistband. 

IMG_2326

I chose the “Darling” view (not “Sailor) and followed the instructions exactly, except for the button loops, which are very narrow. They’re so narrow that when I sewed tubes, it was impossible to turn them right side out, so I improvised by folding and then top stitching. The legs are much wider than the pants I’m used to wearing, but in linen fabric they will be great for the summer. Later on, I want to make the Sailor view, and maybe try leg width variations since the waist, hips and behind fit so comfortably. I love them.
IMG_2342


Leave a comment

What’s a girl to do?

It’s the last week in May, and I have no new garments to show. For a lot of us who sew for ourselves and our family, May=MeMadeMay, which I wrote about recently

As it turns out, transitioning to a new job can be exhausting—even when moving from a 40 hour work week to 28-ish hours. Though, let’s call it 43 and 34, to account for commuting time. My work schedule has been irregular because I started at the tail end of the semester in an academic library. I worked one week at my normal schedule (afternoon/evenings), one week with daytime hours (since that week there were no classes), and then went on vacation for a week. Now I’m back, thankfully with a holiday allowing me two shortened weeks. All that to say, I haven’t been able to find time to make any new duds.

But I have a plan. I’m going to make a pair of pants Endeavour pattern cover 

that I started working on months ago, and I’m going to make a simple top. I believe I can do these two garments by the 31st. I think?

So the challenge or roadblock or stumbling area (whatever you’d like to call it) is that I’m smaller than I was when I started making these pants. But I still need pants, so I’m persevering, And I have a feeling the simple top will be in the Ann Carolyn smock pattern, like this one

Ann Carolyn smock, summer 2016

In the sunlight on the studio deck

but that will come after the pants. More next time.


Leave a comment

Me Made May

This is an annual challenge for garment sewers in which they/we pledge to wear a certain amount of self-made or altered garments during the entire month of May. You can read more about it here: http://sozowhatdoyouknow.blogspot.com/2017/04/me-made-may-17-sign-up-here.html

As Zoe wrote, it’s the 8th year of Me Made May and I have never participated. By the time I learned about it, I was probably wearing me-made nearly every day, so it didn’t seem very fun.

FullSizeRender

Blouse in progress.

Today, I happen to be starting a new job. One of the greatest things about the new job is that I will be able to wear my own clothes after seven years of wearing a uniform to work. This means that for seven years, I have been dressing like many of my coworkers and unable to express myself through my clothes. I am pretty excited about this change, as a matter of fact.

So I’m doing Me Made May. I’ve made my pledge on So Zo’s blog:

I, Accacia (@AccaciaMax and punsnneedles.wordpress.com, sign up as a participant of Me-Made-May ’17. I endeavor to wear handmade clothing each day for the duration of May 2017. In addition, I pledge to use stash fabrics to sew two or more new garments for my work wardrobe.

That last part, the bit about sewing some new garments—well, I’m going to need some new duds, right? I’m also going to have some more time to sew since this new job is part-time.  The part about using stash fabrics—as you may suspect, a part-time job means part-time income, so I’ll be trying to save whenever I can. Thankfully, I have plenty of good fabric saved up. I’ve already made a list and it’s more than two items long.

I will be sharing some of my outfits here and on Instagram @AccaciaMax.


Leave a comment

Fast or slow—What’s better?

When I started sewing lots of clothes, I felt pretty good when I could knock out a dress or a shirt in a day, or maybe a weekend. That meant I was good; I found a good pattern, I enjoyed myself, everything worked right. Excellent.

But then I started learning about fit, and everything took longer because I wanted to spend the time to make it fit well. I took an online class on couture sewing and the project involved a lot of hand sewing and extra layers and well, don’t tell anyone, but I never did fully finish the dress. I ran out of time but was also kind of overwhelmed. Making something like a formal dress with couture methods, jeans, or a suit takes time. And there’s no reason to rush. I’ve been making peace with slow sewing. It’s nice to not have a deadline (self-impose or otherwise) and to relax and enjoy the process.

Also, sometimes I have an entire weekend, or a few weekdays without work, during which to sew with few interruptions. But most of the time, I’m sewing on a weekday afternoon in the middle of a split shift at work, or on a weekend day between other obligations. Without having huge blocks of time, it doesn’t make sense to try to knock out a shirt in a day.

But a recent weekend was different. I was feeling pretty terrible about work and decided that it would make me feel better if I spent ALL of my time sewing. Boy, was I productive. I started out with a leggings pattern that I bought months ago, thinking it would be fun to try. Several hours later, once that was finished, I moved on to a knit shirt, in a pattern I’d made twice before and whipped that up in 90 minutes.

Holy smokes — I finished a pair of leggings, in a new pattern, and a shirt/sweater before we left for the movies on Saturday night. And on Sunday, I was able to take a great walk and have lunch out with the Machinist, so it was kind of well-rounded. When we got home on Sunday afternoon, I started another project, though this one is going to take a while…